Author: vvvbandi

Using Unity for Enterprise Applications

Unity is a Game Engine

A Unity sample game

Unity is a Game Engine. It is designed to power games. 2D games, 3D games, mobile games, console games, PC games, it doesn’t matter. In fact, Unity can support almost every platform in existence that can run games.

Unity is a great Game Engine. It’s been around for a long time, had 5 major versions before it switched over to the current version numbering based on release years. When Unity’s own creators talk about it at conferences, such as Unite, they always talk about deploying your “game”, moving your “player”, downloading “levels”.

However, something new is happening around Unity. More and more people are starting to use it for things other than creating games. Actual “apps” are written in Unity – either because it supports all those platforms I mentioned before,  or because it’s (relatively) easily accessible graphical capabilities and huge Asset Store are hard to match on native platforms – or maybe the developer didn’t have experience with other developer tools and languages for the target platform.

Small utilities, navigation software, kiosk apps, data visualizers, training applications, even some traditional grid / form-based enterprise software are being written in Unity. And recently, AR and VR has entered the scene, with its inherent hunger for a mature, performant 3D engine. And in this field, Unity has become the #1 engine by a wide margin – because of its wide platform support, and the ability to adopt to stereoscopic rendering other new paradigms required by AR and VR headsets.

Being someone who has developed “applications” during most of my career (apart from a fun, but unsuccessful excursion to the world of rhythm games), AR development is also where I met Unity. After I first saw the original HoloLens in person in late 2015, I decided that it’d be the next thing for me. And when I got my hands on a device, I began to get acquainted with Unity’s foreign concepts.

And oh boy, were they foreign concepts. From the flat, 2D scene of the web, WPF, Silverlight, Windows Phone and general XAML world, I got into the wonderfully crazy world of 3D: scenes, prefabs, GameObjects, MonoBehaviours (with an “ou”!), breaking of C# coding traditions (lowercase method names anyone?), game loops, pixel shaders, vertex shaders, private methods that are somehow still invoked by the engine, and the list goes on. Even after speaking at local and international conferences, keynoting Microsoft product launch events, being a Microsoft Most Valuable Professional for nearly a decade – I felt like a total noob.

Of course, the creators of Unity are incredibly smart, and they’ve given a lot of thought throughout the 14 years behind Unity on how a game engine should work, how games should be architected. They are calling private methods from the engine because that’s faster. They have broken C# coding conventions because the original scripting language of Unity was Javascript.

So that’s Unity. A Game Engine, used to create games.

AR is not a Game (for now)

But for AR headsets like the HoloLens, the market is not in games. No consumer has a HoloLens – the hardware is not there yet (even with the second generation), and it is way too expensive to play games. So, if I wanted to make money from developing for HoloLens, I had to create apps. For large companies. Enterprise apps, that make people’s training and work more efficient, allow them to communicate better, to achieve more.

See the source image
Using Hololens for training

But enterprise apps have different requirements than games. A game is all about exploration (find a way out of the maze, find the most efficient and cool way to defeat an enemy) and mastery (getting better at certain tasks, such as wielding a lightsaber or dodging bullets). But an enterprise app is poorly designed if you need to spend multiple minutes trying to find how to print a document, gradually getting better at it after many failures.

On a technical level, a game is usually all about performance. Animations must be smooth; 3D models need to be simplified so that they can be displayed at a solid framerate, and often in a way that thousands of objects can be rendered at 60 fps, with realistic lighting, physics and so on. It’s not an easy task by any means. But once a game is released, it is done – most games rarely gain new features after release, only patches to fix bugs.

Enterprise apps have other priorities. Enterprise apps need to be in service for years, expanding the feature set multiple times, due to a changing legal environment, end user requests and so on. Testability, an agile codebase, maintainability, separation of logic and presentation are all very important, while performance is OK if it is stuck at the “good enough” level. After all, your typical enterprise AR apps of showing a few text fields, and a couple of arrows pointing at different areas in the real world, with non-realistic lighting doesn’t take up much rendering performance. And yes, some performance optimization is still necessary for AR headsets (we are talking about mobile level CPU and GPU displaying 2xFull HD resolution), but if you’re careful about a few basic rules, you’ll be fine.

The Best of Both Worlds

When I was doing “apps” with XAML technologies, I took full advantage of the separation of presentation and logic. Often, we’d work in teams: I created the logic, made sure it worked properly using unit tests, and handed it over to my colleague who built the presentation layer in XAMLO on top of my logic. We rarely had to touch the logic layer thanks to the automated unit testing practices I followed. This was helped greatly by the MVVM architecture that is widespread in the XAML community and is still in use today.

But Unity doesn’t have MVVM, and its game-oriented internals force your app to have a game-y architecture as well. I tried to adopt the Unity approach to enterprise apps, but anything beyond a simple prototype got much more difficult to make than it should’ve been.

I set out to research how others were tackling this issue – and couldn’t really find a solution that fulfilled my needs. So, I started working on my own solution – MVP Toolkit for Unity.

MVPToolkit for Unity

Demoapp Screenshot
The main test scene of MVPToolkit

MVP Toolkit for Unity is an implementation of the Model-View-Presenter pattern for Unity. It is open source, and available on GitHub.

I set out the following goals for MVP Toolkit:

  • Provide a clean separation between business logic and presentation
  • Allow the business logic to be testable outside of Unity, enabling unit test integration with build servers, super-fast unit testing, or even live unit testing (unit testing as you type) in tools such as Visual Studio.
  • Be lightweight, so that you only have a few concepts to learn
  • Doesn’t force you to use it – adapt for just a small module, or as you see fit

I’ve been using it and evolving it on multiple projects, including a complex real-life enterprise AR project. While I don’t consider it complete, I am happy that I managed to achieve my goals. We can work together with a Unity developer in a similar manner than I did in earlier XAML projects:

  • I create the logic, using test driven methods
  • My colleague takes the logic and attaches the views and presenters
  • Things work on first try 90% of the time.
LUT2
Unit testing the logic with Visual Studio Live Unit Testing

I plan on creating a blog post, and perhaps even a video series on the different aspects of MVPToolkit for Unity. In the meantime, please check out MVPToolkit-Unity on Github, and let me know what you think!


Escape from Flatland – my Øredev talk

Last November, I gave two talks at Øredev in Malmö, Sweden. Unfortunately, it took 4 months to make it happen, but finally the video of my talk – Escape from Flatland – is available as an online recording.

I’ve poured a ton of stuff I learned about AR/VR/MR design into this 35 minute talk. It is full of how-tos, tips, traps to avoid, motivational examples and case studies for aspiring designers aiming to take their first step in the wonderful world of spatial computing. Here’s the talk’s abstract:

“When getting started with AR and VR development, the most difficult challenge to overcome is not technical — it is to think and design spatially instead of in 2D. Just like the characters in Edwin A. Abbott’s novella, most design teams find it difficult to escape traditional 2D thinking and seize the opportunities the new technologies present. This talk contains tips & tricks on how to think in 3D, alongside inspiring real-world examples and demos.”

Enjoy and let me know your thoughts in the comments!

EscapeFromFlatlandPoster

Thank you Hasko and Exa: The Infinite Instrument VR for allowing me to use a video clip and music in my talk!

HoloLens 2 – a Detailed Analysis

HoloLens 2 – a Detailed Analysis

On February 24, Microsoft has introduced HoloLens 2 to the world at the Mobile World Congress in Barcelona. And boy, what a launch it was! As with the launch of the first HoloLens four years earlier, this day will be remembered as one of the most important days in the history of computing – regardless whether Microsoft will be successful in their endeavors or not.

This analysis is not a quick first impression. It is based on 12+ hours of research and 3+ years of experience developing Mixed Reality (HoloLens, VR, and since last week, Magic Leap) applications, mostly for the enterprise (manufacturing, maintenance, repairs, health, aviation and so on). This post is loooong. And detailed. And I had to split it into two parts because I’ve got too much to say about the whole announcement apart from just examining the heck out of the device itself.

Note: I’ve not been lucky enough to see HoloLens 2 in person yet, so please be aware of that while reading. This post is based on:

And many others, including tons of tweets, conversations with fellow Mixed Reality enthusiasts, and even some answers to my continuously nagging questions from Microsoft. Having said that, any mistakes in this post are my fault alone. If you find one, please let me know!

Microsoft’s Goals

With Hololens 2, Microsoft is focusing exclusively on the enterprise, aiming this device squarely at first line workers and other enterprise scenarios. Alex Kipman has stated that with the next generation of HoloLens Microsoft has three focus areas: more immersion, more comfort, more value right out of the box. Let’s look at these in details.

More Immersion

An Increased Field of View

By far the number one complaint against HoloLens was the limited field of view. People have described looking at holograms as if you were seeing them through a mail slot. In practice, after showing HoloLens to hundreds of people, I found that most people could get used to the limited field of view after about 5 minutes. However, most demos don’t last 5 minutes, and this gave HoloLens a worse reputation than it deserved. I’m not saying that the field of view wasn’t a problem, but it wasn’t as much of a limiting factor as the media and most first-hand experiences made it out to be. Clever application design and taking advantage of spatial sound could mitigate most of the issues and made living with holograms not merely a bearable, but a useful and even pleasant experience.

A larger field of view is of course a very welcome change. And Microsoft has increased the diagonal field of view from 34 to 52 degrees. Most of the growth is vertical, meaning the picture is no longer 16:9, but has an aspect ratio of 3:2. This should take care of the “mail slot” comments. The pixel count and the viewable area has more than doubled. Luckily, the HoloLens ditched Intel’s processors (Mr. Kipman called this decision a “no-brainer” due to Intel’s shortcomings in the power efficiency area). HoloLens 2 will sport a decent Qualcomm Snapdragon 850, which should have no problem keeping up with the increased demands on the GPU.

New Display Technology

For the display, Microsoft has introduced a novel approach by combining two previously existing technologies: MEMS displays and waveguides. Waveguides have been used in the previous HoloLens, as well as with Magic Leap One, and a lot of other AR headsets. However, the images projected into the waveguides are now created by high precision laser beams – reflected form a set of mirrors vibrating at a crazy 54000 times a second. To design the entire optics system, Microsoft has used the vast computing capacity of its Azure cloud to simulate the path of the different colored laser beams through the waveguide almost at the photon level. And I can’t even fathom the incredibly intricate manufacturing process that’s needed for such precision.

Laser beams and mirror

The result is a picture that retains the high pixel density of the original HoloLens, while more than doubling the viewable area. It is also much brighter, capable of 500 nits, and judging from some of Microsoft’s materials, should be suitable for outdoor usage. (Bright sun causes the image of the current HoloLens to be completely washed out).

Microsoft is also ditching the 3-layer waveguide arrangement they used in HoloLens 1 (one for red, green and blue), and replacing it with a dual waveguide configuration (one for red and green, and one for green and blue). This should help with the color inconsistencies somewhat, but I’ll have to see what it means in practice.

HoloLens 3 waveguides

The unknown factor of this new optics system is of course the image quality. Waveguides are prone to have image quality issues, such as colorization. We have to see how much worse things get with the laser projection system. Most reviewers have not mentioned image quality at all (this is different from rendering quality, which is clearly better). This indicates to me that it is more or less in par with the first HoloLens or Magic Leap – any striking differences would have been talked about. However, image quality is much less important in an enterprise scenario.

But there’s another reason why a larger field of view is important for HoloLens 2. And that is the feature that pretty much stole the already super strong show: direct hand interaction.

Direct Hand Interaction

Since the first ever HoloLens demo, people wanted to touch the holograms, to interact with them the way they interact with real objects – with their hands. Push buttons, grab and move objects – or just poke them to see if they are real.

While it was possible to detect the hands of a user (as long as it was in one of two poses), direct interaction never caught up with HoloLens. The reason: the field of view was so limited, once you got close enough to touch a hologram, you could only see a very limited part of it. Because of the extreme clipping, most designers kept the holograms at the recommended 1.5 – 5 meter length (5-16 feet). This distance is of course, out of reach, so remote manipulation (using the head’s gaze as a cursor and the hand as the mouse button) was the preferred interaction model with HoloLens.

We got a taste of direct manipulation with Magic Leap (especially the Tónandi experience), which has a larger field of view than the original HoloLens. But most of the applications are still using the controller instead of direct manipulation.

hand tracking

But HoloLens 2 does not come with a controller, and when asked, Mr. Kipman has mostly evaded the question. So, direct hand manipulation is the number one way to get in touch with the holograms. You can poke them, resize them, rotate them, move them. You can press buttons, turn dials. You can even play a holographic piano, and as we saw in the incredibly fun and energetic demo of Julia Schwarz, the hand tracking is sensitive and precise enough to understand what cord you pressed! HoloLens 2’s hand tracking recognizes 25 points per hand, which is more than the 8 points per hand on the Magic Leap. HoloLens 2’s hand tracking also seems super robust based on the videos.

direct manipulation piano

This increased hand tracking quality is made possible by the new depth sensor that allows unprecedented precision and power efficiency. It has excellent short and long-range capabilities with super low noise that not only helps with hand tracking, but also can create a much better depth map of the environment and can even be used for semantic understanding of the device’s surroundings. (The new depth sensor is also being sold as a separate “Azure Kinect DK” device).

The Bentley demo Microsoft is showing off at the Mobile World Congress has blown away the mind of many who were lucky enough to try it. The demo involves two users, who can both pick and manipulate virtual objects, and see what the other user has in their hands. Hand tracking is so precise, that during the demo, participants are asked to give the objects to the other person and take their objects instead! All of this works naturally, without any strange gestures or commands to learn. Just as if you were exchanging real objects.

I’m super excited to see for myself how the direct hand interaction works. But from the demos and videos (and I watched a lot of them), it seems like Microsoft has got it right, and with a well-designed interface that follows real world objects (dare I say skeuomorphic?), interaction will be a breeze.

Instinctual Interaction

Of course, there are other interaction types on HoloLens 2. Voice commanding (which works offline), dictation (you’ll need an online connection for this), gaze (a pointer that follows your head), Bluetooth keyboard and mouse are all at the disposal of the designer. But so is eye tracking, which has been shown off to understand that you are approaching the bottom of a web page and will make it scroll up all by itself.

direct manipulation slider

Microsoft calls all these interaction types “Instinctual Interaction”, because you instinctively know how to use a button, turn a dial, grab and move an object, dictate, etc. I have a feeling this is just a re-branding of the term “NUI” (Natural User Interface), which is based on the same principles – bringing what you’ve learnt in the real world to human-computer interactions.

Eye Tracking

eye tracking cameras

Speaking of eye tracking, it is handled by two tiny cameras close to the nose, at the bottom of the glasses. It remains to be seen how precise and useful these are for interaction, but they also have two other purposes. They automatically calibrate the HoloLens according to your IPD (inter-pupillary distance) – this is key for proper depth sensing and reducing eye strain. The eye tracking cameras also work as a retina scanner to securely identify users the moment they put on the headset. If you’ve ever typed a password in a VR or AR headset, you’ll welcome the relief of instant login.

Microsoft has not implemented foveated rendering in Hololens 2. Foveated rendering in short is the technique that only creates high definition visuals around the point where you’re looking at – and keeps the visuals blurry outside the small area you’re focusing on, where your eyes are not sensitive to details anyway. Foveated rendering makes the job of the GPU easier while – in theory – keeping the perceived image quality the same. Technically, they could add this later as an upgrade. Eye tracking is available, and the Snapdragon 850 supports foveated rendering.

More Comfort

Microsoft’s aim with the new HoloLens is to make it a tool for first-line workers. Office jobs already give people a ton of computing power in the form of PCs, laptops, mice and keyboards. However, in the field, people need both of their hands to fix an airplane engine, install electricity or even perform surgery on a patient. They work in 3 dimensions, on 3 dimensional problems, instead of the 2D documents and tables. They need access to the right information, at the right time, and at the right point in space. And they need to use their devices throughout the day, even if just for short intervals at a time.

One of the most striking things when just looking at the new HoloLens vs the old is how the design of the headset has been changed. The heavy electronics has been split into two – with the computing part and the battery being moved to the back of the head. This puts the center of mass right above your spine instead of on your forehead, significantly reducing muscle strain in the neck. The headset has been also cushioned in a way that is super comfortable, and you can wear it for a prolonged time. All of these make HoloLens 2 feel significantly lighter and more comfortable than HoloLens 1 did, despite being only 13 grams (0.03 pounds) lighter. Hololens 2 components

Of course, all computers give out heat, and a state-of-the art AR headset is no different. However, judging from the heat dissipation mastery we’ve seen on HoloLens 1, and the extra cooling areas available for the unit at the back of the head, I don’t expect this to be a problem.

Speaking of the computing + battery unit: some people even call it a bun. That’s a fitting name which made me wonder how it would fare for users who have an actual bun at that point of their head. It will also negatively impact laying back on a high-back chair as the “bun” will not allow your head to lay on the headrest. Of course, this is more of an issue for the knowledge worker than the first line worker Microsoft is aiming the new headset at.

Fitting

Putting on HoloLens 2 is simple – just pull it over your head like you would with a baseball hat and tighten the dial at the back. I love Magic Leap’s solution for the same problem, but Microsoft’s approach is more practical and probably more solid when you are moving your head to look inside and around equipment or look up at a car on a lift. It also seems like HoloLens 2 is a one size fits all device, which is again a welcome feature for workplaces that have more users per HoloLens. However, you do have to calibrate the eye tracking for a new user, which takes about 30 seconds. Ah, and the big thing: unlike with Magic Leap, you can fit your actual prescription glasses under the HoloLens.

fit

Flip It Up!

Another striking new feature of the headset (again, super useful for first-line workers) is that the visor at the front can be flipped up. This allows unobstructed view of the environment as well as eye contact when talking to peers. HoloLens 1 also allowed the user to have eye contact with people around them, but it did require extra effort on the ones not wearing the HoloLens, much like a pair of (moderately dark) sunglasses would.flip

Customization

Microsoft is also launching the HoloLens Customization Program that allows partners to tweak the hardware itself to fit their environmental needs. The first such partner is Trimble, who have created a hard hat solution that only keeps the front and back parts of the HoloLens, and completely redesigns the rest – including the flip-up mechanism, the fitting mechanism and even the way the wires travel. TrimbleLensXR10_w_HoloLens2

Peripheral Vision

In a factory or construction environment, it is very important not to have your peripheral vision constrained. A thick frame around the glasses, such as Magic Leap’s have proven to be a showstopper for some of my clients just for this reason. You need to be able to see an approaching cart, you must see where you’re stepping – no matter how magical or useful the holographic world is, these safety rules are way more important.

With HoloLens 2, your vision of the real world is not constrained, especially with the flip-up feature. This may look like a small box to tick for Microsoft, but it shows their understanding of the target environment and commitment to truly bring a useful device to market.

Value Right Out of the Box

One of the big problems with HoloLens was that to get some actual value from it, companies had to hire expensive consultants and developers, and embark on a many-month journey just to get to a prototype. A prototype they usually couldn’t get actual value out of, apart from showing it at trade shows and creating cool PR videos. While creating dozens of such demos paid the bill and has been very educational for me personally, it was very rare that a company went beyond the prototype phase. Even a Pilot where they would be able to measure the ROI of a small, but actually working system rarely happened. This is not just my experience, it is what I’ve heard from other consultants in the space as well. The real success stories, with wide HoloLens deployments that generate value are rare. This is natural as the technology is so new, and a lot of the exploratory prototypes ended up with “This has great potential, but let’s get back to it in a few years, when the right device is available”.

For Microsoft, the problem with this was that they couldn’t sell devices and hasten the MR future they envisioned. Even the largest enterprises only bought a few HoloLenses, created a prototype or a demo for a trade show, but never put the – otherwise great – ideas into production, due to the shortcomings of the original HoloLens. There were some exceptions of course, but not enough to really move the needle.

Enter HoloLens 2, with a clear and ruthless focus on increased comfort and usability for first-line workers. Every decision Kipman and his team made designing HoloLens 2 screams “enterprise” – and it is an excellent strategy. But something was still missing. Why would an average enterprise buy a HoloLens 2 if they had to go and get vendors to develop applications that they can actually use? What good is an amazing head-worn computer without the software?

Microsoft has been talking to their customers and was watching what their partners were building. They have identified a few common applications and created turnkey solutions that aim to be killer apps.

“Remote Assist” that a worker can use to get help from his/her more experienced peer through a secure video call, and the ability to place drawings, arrows and even documents in the real world.

Remote Assist

“Guides” can help you learn how to perform tasks, such as fixing an engine through holographic instructions that guide you through the steps by understanding where the engine is, and pinpointing areas of interest.

Guides

And “Layout” to plan a space, such as a factory floor, a museum or an operating room in both VR and AR.

Layout

Microsoft hopes that these typical first party apps (I’ve created a few prototypes like these myself) will help answer the question of what the actual value of a HoloLens is. I still feel that the real killer app is missing, or maybe being secretly developed – but for the right customer, even these apps can justify the purchase of HoloLens, and are most certainly cheaper than hiring a team of professionals to develop them from scratch.

Summary

So, has Microsoft accomplished what they set out to do and created the perfect enterprise AR headset? I believe so. They are ticking all the boxes, and they are the right boxes at the current state of the industry. Other companies will no doubt follow, with more specialized, cheaper, lighter headsets that may be better for a specific task. But it is clear that when it comes to Mixed Reality and business use, Microsoft is ahead of the pack with a comfortable and very capable headset that has the ecosystem behind it.

Speaking of the ecosystem… Microsoft’s announcement wasn’t just about the enterprise. Mr. Kipman has stated multiple times that they are thinking hard about the consumer market. They need a more immersive display, better battery, a lighter, better design, and a $1000 price to get there. And he said that Microsoft is working towards that goal. And some of the – seemingly enterprise-oriented – services announced today have serious consumer implications. Azure Remote Rendering allows for a less powerful headset (see also: weight, comfort, battery), and Microsoft is gathering invaluable field experience here – starting now. Azure Spatial Anchors are the beginning of AR Cloud, and again – Microsoft is gathering invaluable field experience, and laying the groundwork there. Azure Kinect DK can be super useful for ambient computing, even in the homes (paired with microphones). I’ll talk about these in a future blog post – this one is already way too long.

Do you have a thought on the above? Clarification? Did I get something wrong? Let me know in the comments!

How to Achieve a 5-Wow HoloLens Demo – Preparation and Storytelling (Part 3 of many)

Preparing Your App

Demos are… different. You may have a fully functioning application that works well in its intended environment, with servers and cloud services and so on – but to actually demo it is a whole other story altogether.

The goals of a demo are different than the goals of a live application. A demo is all about making the user understand what your system is capable of. It’s about highlighting a carefully selected set of features instead of showing the whole, complicated system in its real environment.

too-much-work-not-enough-time[1].jpg

Since the goals of a demo are so unlike the goals of an application, the demo app should be different, too. If this sounds like a lot of work and almost like creating an entirely new application, you are on the right track. I’m not saying that you have to re-create everything from scratch – you can reuse assets, animations and parts of the architecture – but you do have some coding and thinking ahead of you. Let’s look at the peculiarities of a demo!

Users are unfamiliar with the problem domain

It is the nature of demos that the people you’re showing your application to often have zero idea about what the application does, or about the area or industry you’re app is solving problems in. So, you should simplify things and take time to explain the environment in your application is running in, and the kind of problems it is trying to solve.

Users are unfamiliar with HoloLens

Three years after its initial announcement in 2015, a lot of people have heard of HoloLens, and even seen some videos. But most people have not experienced it in real life and have no idea what to expect. So, you must help them putting on the headset, and practice basic interactions such as air-tapping.

Time is Limited

Whether we are talking about a demo at an expo, where people are lining up to experience your great thing, or in the meeting room where decision makers are (more or less) patiently waiting for their turn with the new shiny thing, 5 minutes is all a person gets in most cases. Ten minutes max if you’re lucky and talking to a high-level executive. Subtract the time needed to put on the headset, explain the scenario and basic interactions, and you’re down to just a few minutes of actual demo.

Users may give up

Sometimes people you’re demoing to will have had enough even before your carefully scripted story can conclude.

You have no idea what the user sees

I discussed this in the previous post – since HoloLens is a single user device, you most often have no idea what the user sees.

If you have ever given a 5-minute to talk, you know that it’s much more difficult to prepare for and perform, than it is with an hour-long speech. You must really focus on the gist of what you want to communicate. The same thing is true for a 5-minute demo. This is where a carefully scripted story becomes a must. I’ll talk about how to create such a script for maximum impact a bit later. For now, let’s look at the features your app should have to address the above issues.

Simplified Controls

You may have a super-efficient and fancy way of placing virtual objects in the environment, rotating them, moving them around, interacting with them, pressing buttons, and so on. You may use two handed tap-and-hold gestures to rotate and resize stuff. But since this is a demo situation, and a lot of your users will probably have not even seen a HoloLens before. You shouldn’t overwhelm them. Stick to the basics. Believe me, even a single air-tap can be daunting to first time HoloLens users. Two handed tap-and-hold-and-move-both-hands-in-a-coordinated-fashion gestures are almost guaranteed to fail for a HoloLens newbie.Fisher-Price-Toy-RC-Remote-Control-Thomas-The[1].jpg

If necessary, simplify your controls so that whatever you want to show in the demo can be shown using only basic air-tap gestures. You can still have optional features that require more sophisticated interaction techniques, such as air-tap and hold or air-tap and drag. But to accommodate those who are struggling with hand gestures, make sure the demo can be traveled through without these advanced gestures. Most people blame themselves and not the technology when they are struggling to use it. And you don’t want people to come away feeling inadequate after the demo. Make sure that you construct your app UX in a way that allows users to go experience the main points with just the clicker.

Special Voice Commands

I always find it very useful to build special voice commands into the application.

Restart Application is a command that is thoroughly tested to restart everything from scratch and prepare a new demo scenario. It resets everything that may have been moved, moves all state machines to their initial state, and so on. In fact, the whole demo app must be constructed in a way that even the architecture guarantees flawless restarting as much as possible. It is very unprofessional to have a demo that remembers parts of the previous session. You’ll have no idea what’s going on while the big shot CEO is wearing the headset. For high stakes demos, make sure you devote enough time to testing this restart mechanism thoroughly.

Reset Panels, Reset Layout or something similar if users can move stuff around and reorganize the virtual space. This allows you or them to quickly move everything back to its place without affecting the demo flow.

Demo Companion App on the Phone

You may even want to invest into a small helper app on a phone or tablet. This app will be running in parallel with the actual demo, but it is in your hand while the demo is proceeding. Looking at the app, you’ll be able to see the demo’s state, and also control it.
The Demo Companion App eliminates a lot of the issues I talked about earlier. Because it displays the state the demo is in, you don’t have to keep asking the user what he or she sees, whether the air-tap on the “continue” button was successful. If the user is struggling with the gestures, you can even send the Continue command to the demo app from your phone. Or trigger an event in the demo process. You can give the Restart App and similar commands and verify the results without asking the HoloLens user.

The Demo Companion App has its costs, too. Apart from the extra effort required for development, it requires a more complicated on-scene setup than a standalone demo running on the HoloLens itself.

The phone (tablet) running the Companion App and the HoloLens must be connected through Wifi or Bluetooth, and there are extra steps you must take when preparing the demo to verify that everything is set up properly.

I’d recommend using a Companion App at exhibitions or really high-stake demos. These scenarios can validate the extra effort that’s needed, and the Companion App can also result in one extra Wow for your 5-wow demo.

Storytelling

Storytelling is probably the most powerful tool to make people remember. Still, a lot of people giving demos completely overlook this aspect of the demo.

You don’t have to craft an elaborate Shakespearian story for your demo to be impactful. But it is super useful to build up a script of a demo, and use that as the guideline (dare I say: preliminary specification) throughout development; and it is often referred to during preparation and the demo itself.

When working on POCs (Proof of Concepts), I always start with a script. The user puts on the HoloLens and sees X. Clicks here, Y happens. Say a voice command, Z happens. And so on. This script is almost like what you’d do for a short video. In fact, a lot of the concept or demo videos I’ve worked on started from the same script as the demo app itself.

These scripts are designed around WOW-points. A WOW-point is where the person you’re demoing to will say “wow” or “that’s cool” or “nice” or something similar. I also try to make sure to have a grand finale, a big WOW-point at the end.

Let’s have a look at a concrete example – the first HoloLens app and video I worked on before I became an independent consultant. The app is called “HoloEngine” and you can download it from the Microsoft Store for HoloLens. I still love to give this demo as a first introduction to HoloLens, because it shows off almost all capabilities of the device.

Here’s how the HoloEngine demo goes:

1. Wearing the HoloLens, I start the app, which puts a holographic engine at about 2m in front of me. I make sure the volume is set to maximum.

2. I move the engine on top of a table, if one is around.

3. I take off the HoloLens, careful that I don’t cover the positional cameras so that they can keep tracking the environment.

4. I put the HoloLens on the head of the user. I make sure that he’s facing away from the engine while doing so, and is far enough to see the entire engine.

5. I ask the user to confirm that a blue dot and a small arrow is visible.

6. I ask them to turn their head in the direction of the arrow. I can also point at where I put the engine, and tell them to look there. I carefully examine their HoloLens from the side, and can see through the leaking light when they are actually looking at the engine.

Engine on table.gif

7. WOW Point #1: If a HoloLens newbie sees the engine, this will be their first wow experience. It may not look like much to our eyes, but if you remember your first hologram, you know why it’s such a big deal to see an artificial 3D object in the real environment. So, the first WOW is free!

8. I let them examine the engine for a few seconds, then I call their attention to the buttons below the engine. I tell them to move the blue dot (the cursor) on top of the Play button.

9. Either now, or before the demo I explain the air tap gesture, and ask them to perform it while keeping the blue dot on the Play button.

Engine Start.gif

10. WOW Point #2: The engine starts, and it emits an engine sound. Standing next to the user, I can hear when the air-tap was successful (if I didn’t forget to raise the volume at the start). The realization that the user has pressed a distant button with their hands, and that the engine started is enough to make them go wow.

11. WOW Point #3: I ask the user to turn around in place, and listen to where the engine’s sound is coming from. This introduces them to the spatial sound capabilities of the device, and makes them go wow again.

12. WOW Point #4: I ask them to put the cursor over the leftmost button, which (like other buttons) has a voice command attached to it. I ask them not to air-tap, but to read the hint (“Reverse Engine”) aloud, and the engine reverses it’s direction. The demo has been constructed so that voice command confirmation sounds are audible even for me, standing next to the user, so I’ll know when it was successful.

13. WOW Point #5: Lifting the right hand allows you to move the engine, and your left hand can resize and rotate the engine. Not everybody can perform the tap-and-hold-and-drag gesture for this, but by this time, I usually have a good understanding of the HoloLens-dexterity of the user. If he/she scores too low on this scale, or I’m low on time, I skip this step.

Engine walkaround.gif

14. WOW Point #6: I often need to tell people that they are not looking at a film, and can use their feet to walk around the hologram and look at it from all angles. This usually warrants another WOW.

15. WOW Point #7: while walking around the engine, the user will probably get close to it (if not, I ask them to). When they do, they’ll be able to actually look inside the engine, and see the pistons moving. This is the grand finale, where I can explain the whole point of the demo: that people are better at understanding complex 3 dimensional systems when they actually see it working in 3 dimensions instead of looking at books and perhaps videos.

engine look inside.gif

16. WOW Point #8 (post-credit scene): the last step of the demo arrives when the user clicks on the “i” info button, which takes them to a different scene, with 5 360world employees displayed as 3D holograms emitted from a floating spaceship-like thingy. I usually tell them that just displaying Credits – like at the end of a movie – sounded so last century, so we performed 3D scans of ourselves, and put ourselves into the app as holograms. For kicks, I may tell them about the Easter egg we put here that can be activated by saying “That’s creepy”. No, I won’t tell you what it is, you’ll have to download the app and find out.

holoengine about.gif

As you can see, for my storytelling, I didn’t invent a mythical “John” who wants to learn about engines, and explain things from their perspective. That could work, too, but the important part here is to have a step by step, well-practiced demo, built around WOW points. Out of the 8 WOW points, this demo usually gets around 5-7 wows per demo, depending on how relaxed and outspoken the person I demo to is. But this demo gets them to understand the capabilities of HoloLens (except for spatial mapping), and is enough to plant tons of ideas and start discussing how we can work together.

In the next post, I’ll discuss how you – and your HoloLens – can prepare for a demo. Let me know if you found this useful in the comments!

How to Achieve a 5-Wow HoloLens Demo – Displays, Projectors and Other Equipment (Part 2 of many)

Note: if the first paragraph seems familiar, it is not a coincidence. I accidentally published it along with the previous blog post at first. 

HoloLens is a single user device. This means that nobody can see what the user experiences. Not even you, which usually results in awkward questions like “Did you tap that? Did the button become active? What do you see?”. Not to mention the other guests at your booth or the other participants of the meeting who are suddenly either bored or – in the better case – flood you with questions that you can’t answer properly because you are trying to help the guy who is wearing HoloLens for the first time in his life (which is why you should bring a colleague to these meetings so that one of you can help with the demo while the other answers questions). 

Mixed Reality Capture

Using Mixed Reality Capture can help with some of these issues. It allows (you and others) to see what the user sees and thus you will have a much better idea of what’s going on in his head(set). If you connect your computer to a projector, it also allows other participants of the meeting to join in the demo. After all, nothing is funnier than the vice president of a Fortune 500 company placing holographic space helmets on his subordinate’s head. And joking aside, the demo will be more memorable if all participants in the meeting are involved.

But there are some drawbacks to projecting the user’s experience through Mixed Reality Capture, even if you do it right.

The first issue is that Mixed Reality Capture requires a more complicated setup. It needs a stable local Wi-Fi (especially difficult in an expo, where every booth has their own Wi-Fi hotspot) that you need to set up prior to the demo.

Also, running Mixed Reality Capture degrades the user’s experience – it lowers the frame rate to a maximum of 30, and can make the holograms choppy. It also reduces the resolution for the right eye. This quality degradation may not even be consciously recognized (especially if our “subject” has never experienced HoloLens before), but it does prevent him or her from experiencing your app in all its glory. So, even when I’m using MRC in a meeting, I usually allow for a minute of non-projection time and explain that the projection does decrease quality.

The third issue with projecting what the user sees is that it simply spoils the surprise for the others in the room, and reduces the number of WOWs you get.

So, you should carefully contemplate whether to use Mixed Reality Capture in a demo session – and whether to allow the participants to see it. The answer – as always – is that it depends, and you should decide on a case-by-case basis, considering the app, the audience, the technical environment and your goals of the demo.

In an expo scenario, I prefer to put a pre-produced video of the app on a large TV or a projector. This can attract visitors from further away from your booth, make them stop and take a brochure even if they can’t wait until the end of the line standing by for the demos. The pre-produced video can (and should) be professionally recorded and even include a third person view of the app using Spectator View, instead of a shaky first-person view.

Spectator View

Speaking of Spectator View, an expo or an on-stage conference demo can greatly benefit from an outside, third person view that shows both the user and the full virtual world around him/her. This is not an easy or cheap thing to do (requires a second HoloLens device, a powerful PC, stable communication between the different devices, a good camera and also some setup time), but if you can do it, it’s the best way to show what the user sees.

Spectator view.jpg
Spectator View used by Identity Mine at a conference. From https://www.youtube.com/watch?v=DgIHjxoPy_c

An even better solution is a moving spectator system, where the camera is in motion – but this is something that even Microsoft themselves can only afford at a few high visibility events, and requires a hefty equipment.

moving spectator view equipment.jpg
The moving spectator view equipment Microsoft uses at their demos.

Audio and Visual Clues

Audio is an important part of the HoloLens experience. But it can also help you understand where the user is in the demo flow. In a quiet environment, you can stand close to the user and hear the voice prompts, beeps, etc that you have added to the app, and you can know whether the air tap on the “next” button was successful or not. In my experience, high pitched beeps work best due to the sensitivity of the human ear and the sound frequency characteristics of the HoloLens speaker.

You can also learn a lot by looking at the HoloLens from the side. You won’t know what the user is looking at, but based on the small amount of light at the edge of the display, you can guess the overall brightness and color of the scene in from of them.


HL empty vs start menu.jpg
Looking at the HoloLens from the side, you can see whether there’s nothing in the users view (left) or when they can see the Start Menu (right)


Other Equipment

For a simple on-on-one demo, you may only need a charged HoloLens. If you want to use Mixed Reality Capture to see what the user is doing, you will also need a laptop, a Wi-Fi hotspot (unless you want to rely on the guest Wi-Fi, but setting that up on the spot can be tedious, and it may not even work or be available).

For longer demo sessions such as a whole day of demos at your booth, you’ll need your charger, a Wi-Fi hotspot, a laptop, a TV or projector and so on. You should also have more than one HoloLenses (both for backup and to serve more visitors) and keep them continuously on a charger when not in use. And if you’re using Spectator View or Mixed Reality Capture at your booth, don’t forget to bring all that equipment, too.

In the next post, I’ll discuss how you need to change your app to be suitable for a demo. Because to collect the maximum number of WOWs, you’ll have to. As always, please let me know your thoughts in the comments!

How to Achieve a 5-Wow HoloLens Demo (part 1 of many)

You have created an awesome HoloLens application. It really is great. Now it is time to show it off and make other people experience your incredible holographic powers. You take your HoloLens with the demo app installed to a conference, an expo, or to a meeting room. But how can you realize maximum impact for your demo? How can you get a 5-wow demo session (which means that the person you’re demoing to says “Wow” at least 5 times) consistently, (almost) every time?

5wows.jpg

This blog post series is about maximizing the wow-factor of your demos. I’m sharing the lessons learned during hundreds of one-on-one demo sessions. I’ll discuss demo environment, device preparation, unique app requirements for demo scenarios, storytelling and a one-two-punch approach to wowing your future customer or partner.

The Demo Environment

Let’s begin with the demo environment – where you will perform the demo itself. This can be a meeting room, an expo booth, a conference hallway, your own living room or even somebody’s kitchen.

Before discussing environment tips, let’s first think about how the environment affects HoloLens.

Space

The space requirements for your demo is highly dependent on the application you want to show off. In a typical one on one demo scenario, you can sometimes get by with as much space as you need for 2 people to stand next to each other. But mixed reality mixes reality and the virtual world, so sometimes you need more space. For example, if you want to augment a car, you will need enough space to fit the car, and allow for you and your guest to step back and look at the car from a few meters distance. Meeting rooms are often laid out so that there’s a huge table in the middle, which doesn’t leave much space for people to move around. So, if you’re not in control of the environment where the demo will take place, you may want to request some additional time to move some furniture.  Just let the meeting organizer know that you will need some time to set things up before the meeting.

Lighting

Lighting is important. In low light, the holograms pop out more, look brighter, more solid, more colorful and have more contrast. However, if there’s not enough light, HoloLens may lose its tracking, which relies heavily on the 4 positional cameras on the device. Fortunately for this to happen, the room has to be almost pitch dark, certainly dark enough for people to feel uncomfortable.

On the other hand, too much light can also cause problems. There’s only so much light HoloLens’ displays can add to the environment – and broad daylight can wash out the display to the point of your app being totally invisible. This is one of the reasons why Microsoft doesn’t recommend using HoloLens outdoors.

So, as far as lighting goes, I had the most success with dimly lit rooms – kind of your “romantic mood lighting”. But HoloLens works well even in a fairly well-lit expo hall, too. Just avoid direct sunlight and spotlight if possible.

Walls and Furniture

Let’s discuss walls and furniture next. Again, there are two important things the visible environment influences: tracking quality and the visual experience.

Since HoloLens relies on visual tracking, pure, solid color walls all around can cause it to lose tracking. If you haven’t seen this in action, just stand in a corner of any room with pure white walls. HoloLens will not be able to identify feature points, and tracking will be gone until you step back a little.

Now, just one solid colored wall is usually OK, because HoloLens has two cameras that look left and right, and these are enough (most of the time) because they are also used by the tracking algorithm. Just avoid stepping too close to a solid colored wall. A more textured wall, such as one with tiles, or a poster, or a booth wall with text and graphics will have none of these issues.

As for wall colors, medium and darker colors work best – again because the holograms will pop out better when they are in front of a darker background.

So, if I’m working with companies bringing their HoloLens apps to an exhibition where they control the design of their own booth, I recommend a patterned, not too bright set. Wood furniture also works great, especially if you have a hologram to put on a real table in your app.

If the demo environment is controlled, you may even have the chance to use part of the environment as a set. This rarely happens outside of an expo booth or your own meeting room, but it can help the demo tremendously. For example, while working with 360world, I worked on a booth demo for the World ATM Congress, which showcased HoloTower – an app that air traffic controllers use in the tower. This demo was specifically designed to work with a two-piece set that acted as the “windows” of the imaginary tower, and we had a full holographic airport with moving airplanes right outside these windows.

Madrid demo set small.jpg
The set mimics a fogged in air traffic control tower, but with HoloLens, visitors can see the airport and the planes outside the “window”

Noise

If your app has sound, uses voice commands or speech recognition, you have to take noise into account. Of course, you’ve already considered this when you were designing your app, right? But you may have designed your app for a quiet home or office setting and then you get to demo it in a noisy expo booth of conference hallway with a ton of background chatter.

Unfortunately, the speakers of the HoloLens are pretty weak. The poor man’s, on-the-spot solution to this (after you’ve checked that volume is all the way up and no Bluetooth audio devices are connected) is to ask the user to form a small cup over his/her ears and the speaker.

The much more professional solution is to have an external speaker and attach it to the HoloLens. This can be a Bluetooth speaker or one with a standard headphone jack. Just please don’t use in-ear headphones (earbuds) as those are not too hygienic, especially after being used by dozens of people throughout the day. The advantage of separate headphones is better sound quality (especially when it comes to the lower frequencies) and better separation of background noise. But don’t use noise canceling headphones. HoloLens’ speaker design is augmented sound, meaning the user gets to hear both the real world and the app’s sound – just like she can see both the real and the virtual world. Depending on your app, this augmented sound feature can be important – but even if it’s not, if your headphones discard external noise, that means that the user won’t be able to hear you either while you’re walking her through the experience.

The other issue with noise has to do with speech. HoloLens has a pretty good and well-tuned microphone array, but it can’t do too much to isolate your voice if there are people standing next to you, trying to shout over the general background babble that’s trying to shout over the music coming from the booth next door exhibiting their line of car speakers. Because often this cannot be avoided, and speech recognition issues often lead to jovial ridicule, you should have alternatives built into your app. One alternative is that voice commands should also have a “click” equivalent, such as a button the user can air-tap on to go to perform an action. The other, more sneaky alternative is to have a separate app on your phone, which you activate when the HoloLens demo is running and “fake” that the app heard what the user said by pressing buttons on this app. This solution needs more preparation and better control of the environment, but it can work well, and this demo companion app is something you may want to have anyway (I’ll return to it later).


And that’s it for the fist post in this series. Next, I’ll talk about how to help others (who are not an active participant in the demo) understand what’s going on – including you. Let me know your thoughts in the comments!

András has been a Microsoft MVP Awardee for 10 years now, a Pluralsight author, speaker and consultant on AR/VR/MR technologies, from HoloLens to ARKit.

Demoing HoloLens – Help Users Adjust Their Headset Properly

It can be fairly challenging to put on HoloLens properly for the first time. And a headset that is not properly adjusted can result in blurry or not full field of view.

This was often an issue when I was showing off our HoloLens creations. Sometimes the headset is just not put on correctly, and the user will lose half of the field of view, and often the whole point of the demonstration is lost. Of course, as the demonstrator – the person not wearing the HoloLens – I didn’t see what the user saw or didn’t saw, so we ended up with an awkward conversation.

“Can you see the little blue dot in the middle?” or “Is the edge of the holograms’ display area sharp or blurry?” or “are you sure you’re not seeing about *this* much of the Hologram?”

To help with this issue, the HoloLens calibration tool has a first step that asks you to adjust the device on your head until you see all edges. But that doesn’t help us when we have to demonstrate our own app, does it?

HoloLens calibration experience

So, after doing hundreds of in-person HoloLens demos, I decided it’d be nice to copy this functionality for our own apps. And thus, the HeadsetAdjustment scene has been born. It is currently a PR to the HoloToolkit, but hopefully it’ll be merged soon, making it my second HT contribution.

The Experience

The User will se a similar invitation to adjust the headset so that all edges are visible. He can then proceed to the actual experience by air tapping or saying “I’m ready”. Simple!

20170327_134009_HoloLens_1_2.gif

The Developer’s Side

First, a huge thanks to @thebanjomatic for his tips on finetuning the scene!

The headset adjustment feature is implemented as a separate scene, and can be found as HoloToolkit/Utilities/Scenes/HeadsetAdjustment.unity. The simplest usage scenario is when you don’t want to modify anything, just use it as is. For this, all you have to do is add the HeadsetAdjustment scene as your first scene, and your “real app” as the second. The HeadsetAdjustment scene will automatically proceed to the next scene when the user airtaps or says the “I’m ready” phrase.

HeadsetAdjustment_build.PNG

Of course, you can customize the experience to your liking. To change the text that’s displayed, you can edit the UITextPrefab properties here:

properties.PNG

By default, the next scene is selected automatically based on the scenes included in the “Scenes in Build” window of Unity. In the above example, the HeadsetAdjustment scene is #0 (meaning it is loaded and started first), and the actual app loaded after the adjustment is the GazeRulerTest – the #1 scene.

However, you may want to override this. The HeadsetAdjustment script allows you to specify the next scene by name in the NextSceneName property. If you enter anything here, it’ll override the default behavior of finding the next scene by number, and it’ll load the scene with the name provided in this field.

You can also customize the voice command the user can use to proceed in the Speech Input Source.

Happy demoing!

Now you have a way to ensure that the person you’re demoing your latest creation to has the best possible experience. Enjoy!


HoloLens Mixed Reality Streaming Done Right

Most people will have a huge smiley on their face when you show the HoloLens to them. With way over a hundred demos behind me, only 3 or 4 didn’t agree right away, that mixed reality is the future.

joy
My friend is experiencing the HoloLens for the first time, with a huge smile on his face

So, demonstrating HoloLens is a very grateful job. But it can be pretty frustrating, too, because:

  • You can’t see what the user sees, and can’t offer help or explanations;
  • If there are more people in the room, they’ll be bored as they have no idea what the current lucky person is experiencing.

Luckily, Microsoft has added a way to wirelessly project the so-called Mixed Reality view from the HoloLens. This displays the GPU-generated holograms that the user sees over the video coming from the RGB camera, and streams it real-time to a computer.

hololens tracking
Example of a mixed reality capture – the furniture is real, while the game character and the coins are not.

The problem is, that to get this streaming right, you need to have a lot of things working together. Most of all, you need a fast and reliable Wi-Fi connection. But even then, there is usually a delay measurable in seconds, often as much as 5-6 seconds. This makes it extremely difficult to explain what you’re seeing on stage (because you have to explain what you saw 5 seconds ago, which what the audience sees right now). And when you’re trying to help somebody, it can be downright frustrating, because you say stuff like “yes, there is is… oh wait, there it was 6 seconds ago, move back… not there… the other one… now air-tap… let’s wait a little until I can see that you successfully airtapped…”. In a business scenario this even comes along as unprofessional, and can make the HoloLens look like it’s not ready yet.

To illustrate the delay, I put on the HoloLens, and launched the Mixed Reality Capture Live Preview in the HoloLens Device Portal. Then I opened up and closed the Start Menu. Conditions were fairly good, so I “only” experienced a 4 second delay:

4 sec delay.gif
The ~4 second streaming delay. This is far from ideal for presentations or helping others.

After months of experimenting, and dozens of demonstrations, we at 360world found a way to reduce the latency significantly. This has worked for us a dozen times already, under varying circumstances, including our own office, a client’s office and even in very busy conference locations. And the even better news is that it is easy to implement.

Step 1 – Use Windows 10 Anniversary Edition

You should use Windows 10 Anniversary Edition on the computer you want to stream the Mixed Reality Capture to. (you can just use this computer or a projector to share the results with a larger audience). The reason is that for Step 3, you need a new AE feature.

Step 2 – Enable Mobile Hotspot on the Computer

This is a new feature in the Windows 10 Anniversary Edition. You can access it from Settings / Network & Internet, and Mobile Hotspot:

SharedImage.png
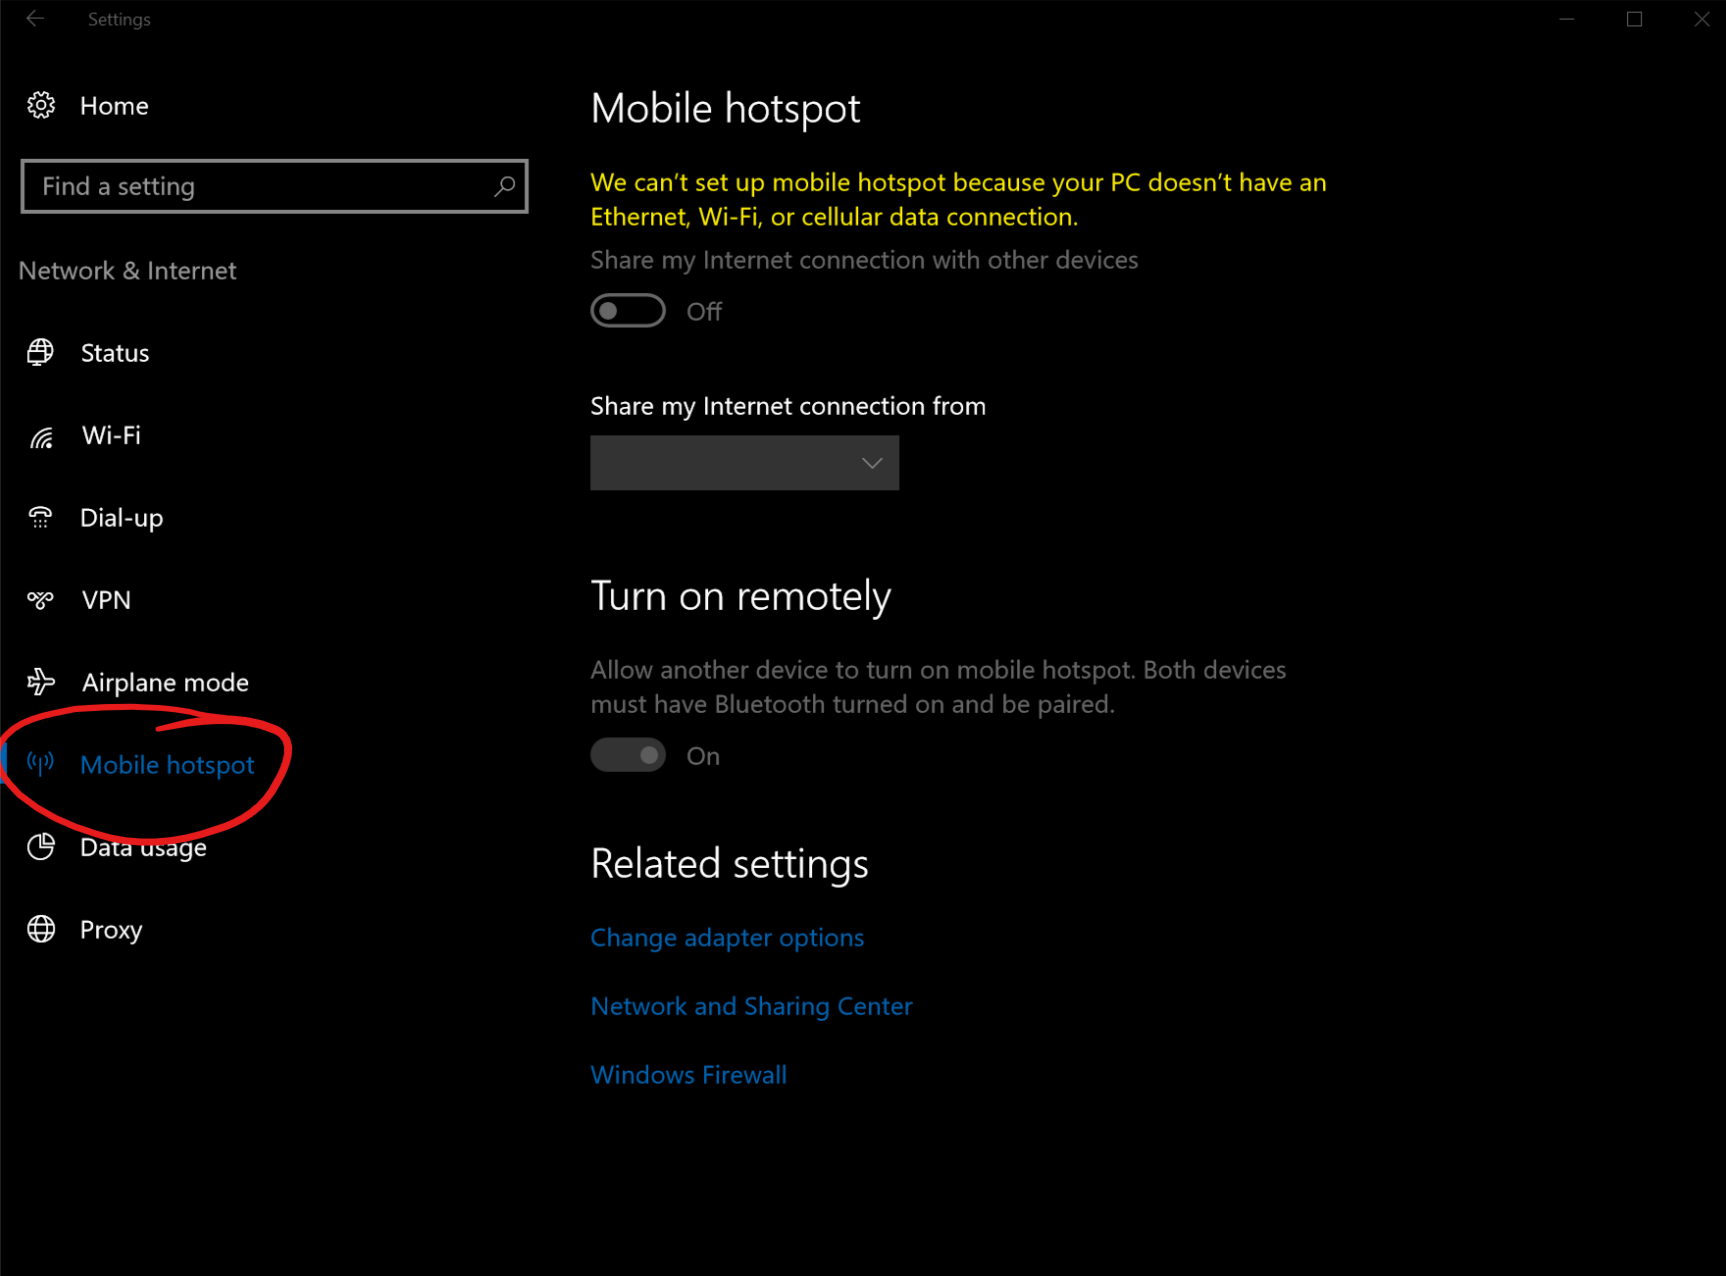
As you can see, the computer has to be connected to the Internet (and has to have a Wi-Fi adapter) for the Mobile hotspot to be enabled. If you can’t see the above warning, all is OK – turn on the “Share my Internet connection with other devices” checkbox.

Step 3 – Connect the HoloLens to the Mobile Hotspot on your Computer

And here comes the trick: once the hotspot is set up, you need to connect your HoloLens directly to the hotspot:

SharedImage 3.png
The HoloLens is connected to the mobile hotspot on the computer

Now air-tap on the Advanced options link, and take a note of the IP address of the HoloLens. You will need it soon.

Step 4 – the HoloLens Windows App

For the best streaming results, forget the device portal. What you need is the Microsoft HoloLens app from the Windows Store. This app has most (but not all) of the features of the Device Portal, and seems to perform much better when it comes to live streaming the Mixed Reality Capture.

Once you have the app installed, click on the + button, and add your HoloLens to the form. This is where you need the IP address of the HoloLens you – hopefully – recorded earlier:


SharedImage 4.png
The Add your HoloLens screen of the HoloLens UWP app


You should now see the HoloLens you just added, and hopefully it is online. If not, make sure that the HoloLens is still turned on. You may need to wait  few seconds before the HoloLens app can detect the device.


SharedImage 5.png
Select the HoloLens you want to connect to.

Click on the connected HoloLens, and

Step 5 – Enjoy!

Click on the first icon called “Live Stream”, and Live Stream should start. To further reduce latency (and not to cause audio issues), you may want to turn off the audio in the … menu.

Here is the result:


much better.gif
Much better!

As you can see, the latency is well below 1s, in fact, about 0.5s! This is more than satisfactory for any kind of live demo, or helping a first-time HoloLens user.

In fact, depending on how noisy the airwaves around you are, you can even switch it to High Quality mode from the default “Balanced” setting.

This solution is still not foolproof. The connection is wireless, and packet losses occur that can add more and more delays to the stream. If this happens, just navigate away from the live stream and quickly come back, and you’re good as new.

nexus2cee_50190-have-you-tried-turning-it-off-hfqe_thumb

To sum up:

  1. Use Windows 10 Anniversary Edition
  2. Turn on Mobile Hotspot
  3. Connect your HoloLens to the Mobile Hotspot on your computer and make sure you know the IP address
  4. Install the Microsoft HoloLens app on your computer, and connect it to your HoloLens
  5. Use “Live Stream” and tune it as you like.


Enjoy demoing HoloLens!


HoloLens vs Meta 2

HoloLens vs Meta 2

A lot has happened this week in the Augmented Reality (AR) / Mixed Reality (MR) space. On February 29, Microsoft has opened up HoloLens Developer Edition preorders for a selected lucky few, and more importantly, published a ton of videos, white papers and developer documentation. This gave us an unprecedented amount of information to parse and learn a ton about the capabilities and limits of the device.

Meta – the other very interesting player in this space – has also opened up a few days later, on March 2. They also opened the preorder for their respective developer kit (devkit), the journalist embargo has lifted and for the first time, we got to see the Meta 2 glasses in action – at least on video.

In this post, I’ll try to piece together all the information I came across during these few frantic days of research. I’ll show what’s common and what’s different in Meta’s  and HoloLens’ approach, devices and specifications, and provide an educated comparison based on the data available.

Disclaimer

And this is the key. While I had about 15 minutes of heads-on time with HoloLens back in November, the device and its software has probably changed since then. As for Meta, all I have to go on is the data available from Meta itself, the reports of journalists and examining videos frame by frame to make educated guesses. I never saw a Meta 2 headset in person, much less had actual time using it. While I’m pretty sure what I’ll write about is fairly accurate, there are bound to be some inaccuracies or even misinformation here. If you find some of these or do not agree with my conclusions, please feel free to comment, and I’ll try to keep this post up-to-date, as long as it is practical to do so. This post will be a work in progress for a while, as more information becomes available and people point out my mistakes or perhaps Meta hits me with a headset to play with (hint, hint).

With that out of the way, let’s get started and see how Meta 2 and HoloLens compare!

To Tether or not to Tether

The Meta headset is tethered. The HoloLens is not. This may seem trivial, but in my opinion, this is the most important contrast between the two devices – and a lot of the other differences come down to it. So, let’s see what this means.

The HoloLens is a standalone computer – a fact that Microsoft is very proud of. Just like a tablet or a phone, it only needs to be attached to any wire is when you’re charging it. During actual use, you are free to move around, jump up and down, leave your desk or walk long distances. This kind of freedom opens up several use cases – walk around a factory floor or a storage space while the device shows you directions and which crate to open; go to the kitchen while keeping a skype video conversation going on the right and the recipe on the left; or bring the device up to the space station, and have an expert on Earth look over your shoulder and instruct you by drawing 3D pointers.

microsoft-hololens-iss-nasa
Astronauts wearing the HoloLens on the International Space Station. There is nothing less tethered than this, folks!

Meta’s tethered experience ties you to the desk (unless you strap a powerful laptop to your back, which has been done). You can stand up of course, but can only move 9 feet, and run the risk of unplugging the device or pulling your laptop from the table.

1194985533695551966dog_on_leash_gerald_g-_01-svg-hi
Image source

On the other hand, the tethered approach has great advantages. You are not limited to the computing power in your headset (which is about the same as a tablet or mobile phone). You can use an immensely powerful desktop computer with multiple high-end graphics cards and CPUs and an infinite power supply.

meta-two-ar-brain-681x383
Meta’s brain image demo uses volumetric rendering, which is not possible on HoloLens in this quality

All of this power comes with great – well not responsibility, but additional cost. We’ll talk about pricing later, but let’s just mention it here that you’ll need a pretty powerful, gaming grade PC with an i7 processor and a GTX 960 graphics card to get the most out of the Meta 2 headset.

It is worth mentioning, that Meta is actively working to create a tetherless device down the road – but this post is about what’s been already announced, and the Meta 2 is tethered now.

Ergonomics, Comfort

One would think that Meta would have advantages on the weight front, since you don’t have to wear an entire computer and batteries on your head.

HoloLens weighs 579 grams. Meta’s headset weighs in at 420 grams, but that’s without the head straps and cables. I’ve no idea why Meta left out the head straps from the calculation, since it is definitely something your neck will have to support – but in any case, I’d estimate that weight-wise, the two devices are pretty much at the same level.

What’s more important for long term use is the actual way your head has to support that weight. I only have personal experience with HoloLens, but its weight distribution and strapping mechanism makes you forget all about the weight in just a few minutes. Both allow for glasses to be worn underneath them – something that is very important to me personally, and I suppose to a lot of other potential users.  Both have a ratchet system to tighten the straps around your head, although Meta’s ratchet seem to be very loud based on one of the videos. Meta also uses Velcro to adjust the top strap – I imagine that people with more hair than me may find this an issue.

usatoday
A Meta employee placing the headset on USA Today’s journalist. Note the thick cable hanging from the device. (source)


All-in-all, I can’t decide whether the Meta or HoloLens is more comfortable to wear on the long run. My guess is that there’s not going to be extreme differences in this regard – not counting the Meta’s tethered nature, which is bound to cause some inconvenient moments until one gets used to literally being tied to the desk. There are also some potential eye fatigue issues that I’ll touch on later.

Software, Development

As mentioned before, Meta 2 requires a hefty PC – and it needs to run Windows 8.1 or newer. Meta behaves like a second screen connected to that PC through an HDMI 1.4 cable, so anything Windows displays on that screen will be shown to the user. It is up to the developer to fill that screen with a stereoscopic image that actually makes visual sense. The best way to do this is by using Unity – a game developer tool, which is quickly becoming the de-facto standard for creating virtual reality and augmented reality experiences. It’s been shown that you can also place Microsoft Office, Adobe Creative Suite or Spotify around you on virtual screens, and interact with them, removing the need to have extra monitors. How well it works in practice remains to be seen though, but one Meta engineer has discarded three of his four monitors in favor of holographic ones.

There’s not much more to go on when it comes to the development experience of Meta. They have time though – their devkit will not be shipping until 2016 Q3.

Microsoft’s HoloLens is a standalone computer, running Windows 10. The same Windows 10 that’s available on desktop, tablets, phones and even Xbox. Of course, the shell (the actual end user experience) is customized for every device. For example, this is the Start menu of HoloLens:

start menu.gif
The HoloLens Start menu. Unmistakably Windows, but tailored to the device


Running a full-blown Windows 10 on HoloLens has some distinct advantages. HoloLens can run any UWP (Universal Windows Platform) app from the same Windows Store that the phones, tablets and PCs use. This means that you can simply pin the standard 2D weather app right next to your window, and you can get weather information by just looking at it. Or pin a browser with the recipe to the wall above your stove. When it comes to running 2D applications with HoloLens, it is less about creating floating screens and windows around you (although you can do that too), and more about pinning the apps on walls, top of tables and other real world objects.

2d apps on wall.gif
A couple of 2D apps pinned on the walls

As for development, Microsoft, has just published an insane amount of developer documentation and videos, which I am still in the process of reading through. As you can expect from a software company, the documentation is very detailed and long. But what’s more important, the platform seems to be pretty mature, too. For example, I was just informed by my friend and fellow MVP, James Ashley that Microsoft has built an entire suite of APIs that facilitate automated testing of holographic applications.

For more involved development, the #1 recommended tool is also Unity. This is great news, since this will make a lot of the experiences created for one device easily transferable to another one. At least from a technical perspective, because – as I’ll detail more later – adapting the user experience to the widely different approaches of these headsets is going to be a much larger challenge. But a developer can also choose to create experiences using C++ and DirectX – technologies that even AAA games use. Not that you’ll be able to run the latest, graphically demanding games on a HoloLens hardware – it has a much weaker CPU and GPU, and performance is further limited by the fact that the HoloLens has no active cooling (fans), and will shut down any app that dangerously increases the device’s temperature.

If you do want to run AAA games on HoloLens though, you can take advantage of the game streaming feature of Xbox One. You can just pin a virtual TV on your wall, and stream the Xbox game to your headset. I expect to see similar techniques to stream desktop applications from your computer in the future.

Resolution, Field of View

Field of View is the area in front of you that contains holograms. With Mixed Reality devices, the FoV is very important – you want the holograms to cover as much of your vision as possible in order for them to feel more real. After all, if images just appear as you move your head, it breaks the illusion, and can make you feel a bit confused.

Ever since its introduction, HoloLens’ field of view (the area in front of you that can display holograms) has been under criticism. Some compared it to looking through a mail slot. Based on data available on the just released developer documentation, I finally have a way to calculate the FoV of HoloLens.

According to the documentation, HoloLens has more than 2500 light points per radian. Assuming that “light points” are basically a fancy word for pixels, this means that HoloLens can display approximately 43.6 points per degree. This is a similar measurement as DPI (dot per inch) for 2D displays, such as phones, although I don’t know how to scientifically convert between the two.

Another place of the HoloLens documentation states that it has a 1268x720p resolution (per eye). So, if we have 43.6 points per degree, and we have 1268x720p resolution, we have a field of view of 29.1×16.5 degrees, which ends up being about 33.4 degrees of diagonal field of view. If my calculations are correct that is. They may very well not be, since Microsoft has given us another number: 2.3 million light points total. 2x1268x720 is actually less than that (calculating with 2 eyes) – it is 1.826 million. So, there is a chance that my calculations are off by 20-30%. (Thank you James for bringing this to my attention).

Let’s see the Meta 2! Meta is not shy talking about their field of view, in fact this is one of their biggest selling points. Meta claims to have 90 degrees of diagonal FoV, which is not only 3 times as large as the HoloLens’, it is pretty much the same size as the Samsung Gear VR headset! 90 degrees is huge compared to pretty much every other AR device – most manufactures struggle to even reach 40-50 degrees.

For a larger field of view, you need more pixels to keep images and text sharp. Meta has a 2560×1440 pixels on its display that gets reflected into your eye. And that is for both eyes, so one eye gets 1280×1440, which is “only” twice as much as the HoloLens display. With a much bigger field of view though, we end up with about 21 pixels per degree, approximately half of HoloLens’ 43. This means that while the experience will be much more immersive, individual pixels will be twice as large. Whether it is enough remains to be seen – I haven’t read any complaints about pixilation though. One thing for sure: you’ll definitely want to move close to your virtual screens so that they fill your vision to read normal sized text. Also, the larger pixel count means more work for the GPU – another point where the tethered nature of Meta is an advantage, and one likely reason on why HoloLens has a limited FoV.

Here is a handy table to sum all of these up – I put the data I calculated / deducted in italic, and the manufacturer provided numbers in bold.

HoloLens (could be higher by 30%) Meta2
# of pixels per eye 1268×720 1280×1440
diagonal Field of View (degrees) 33.4 90
Pixels per degree 43.6 21

Interaction

An important way of interacting with HoloLens is speech. HoloLens is a standalone Windows 10 computer, and thus the applications you create can support speech commands and even integrate with Cortana. Technically, there’s nothing stopping you from using speech commands on Meta either, but this hasn’t been shown in the videos I saw – and you’d need a decent microphone on your PC. HoloLens has an array of 4 microphones that go wherever you go to clearly pick up your speech and filter out ambient noise.

Let’s talk about manipulating holograms, and activating buttons! Probably this is the area where the two products differ the most. Both HoloLens and Meta are able to see the user’s hand, and use what it as a gesture input, without needing to have any additional devices. (Although HoloLens comes with a Bluetooth clicker that has a single button you can press). However, that’s where the similarities end.

Meta thinks that your hands are made to manipulate the environment, and thus it should be the tool to interact with holograms, too. With Meta, you touch a virtual object to move or rotate it, push your finger forward to press a button, close your fist in a grabbing motion and move your hand to move things around in the virtual world. Meta wants to remove complexity from computing with this natural approach and direct interaction. Direct interaction (touch screens) is what made phones and tablets so popular and easy to understand as opposed to the indirect model of a computer mouse.

meta touching windows.gif
Manipulating windows with hand on Meta

This is a great concept on paper, but if the reactions of the journalists who actually had hands-on time with the device are something to go by, needs more refinement until it actually works the way Meta intended. Engadget says this “feature didn’t work great… the gesture experience needs to be refined before it launches”. TechCrunch calls the hand tracking control “a bit more brutish than I would hope”, and praises Leap Motion’s technology in comparison (Leap Motion specializes in 3D hand tracking). But still, the fact that Leap Motion is doing such a great job gives hope that Meta will nail it as well.

leap motion hands.gif
Leap Motion’s Blocks game

HoloLens takes an entirely different approach. Microsoft stuck to the long standing tradition of a point-and-click interface. However, instead of moving a mouse around, you move your gaze – more precisely, your head. For selecting, you perform an air tap gesture, which is analogous to a mouse click.

airtap.gif
The air-tap gesture

For moving, rotating things, you first select the operation you want to perform, then pinch in the air, and move your hand. As I said in my previous post, this takes some time to get used to, but works fairly reliably once you’ve gone through the ropes.

Meta’s approach is certainly more appealing and natural. However, even if Meta works out the kinks, you will have trouble interacting with virtual objects that are out of your arm’s reach. With HoloLens, you can put a hologram to the other side of the room and just gaze (point) and click (air tap) to perform an action.

So, in order to properly interact with your holograms, Meta needs them to be close to you, within an arm’s reach. With HoloLens, you can fill your room with digital goodies, and keep interacting with them.

Hologram Distance

If you look at something close, such as your nose, your eyes get a bit crossed. If you look at something afar, your eyes look parallel. Similarly, depending on whether you look close or far, muscles change the shape of your eyes to make the light focus exactly on your retina.

Neither HoloLens, not Meta 2 take these effects into count, at least not in a dynamic fashion. To lessen eye strain, HoloLens actually suggest that you place the holograms approximately 2m from the user (between 2-5 meters), and cut the 3D image when you get closer than 0.5 meters. Technically you can display holograms outside of this range, but Microsoft warns you that the discrepancy between the “crossiness” of your eyes and the lenses focused at 2 meters may cause stress and fatigue. My guess is that this is one of the reasons why Microsoft opted for the gaze – and air-tap interaction model.

With Meta, virtual objects that you interact with should be kept inside the 0.5 meter threshold (arm’s length). There is even a demo when you lean inside a holographic shoe. I have no idea how Meta’s lenses are focused, and how much overlap the eyes have for eye crossing – but the demo certainly looks cool.

meta shoe.gif
Sniffing the insides of a holographic shoe (source)

Understanding the Environment

Environment awareness for mixed reality means that the software and the hardware understands the environment the user is in. It knows that there is a table 2 meters in front of me, which has a height of 1 meter, and such and such dimensions. It understands where the walls are and how the furniture is laid out. It sees a person in front of it.

Environment awareness is important when it comes to placing objects (holograms) in the virtual world. If your virtual pet runs through the sofa or the walls as if it wasn’t there, it ruins the illusion. If you throw a holographic ball, you expect it to bounce off the floor, the walls and the furniture.

This is an area where I could barely find any information on the Meta 2 headset, apart from a few seconds of video showing a ball bouncing off a table.

meta bouncing ball
Meta demonstrating a ball bouncing off a table

The situation is different with the HoloLens. Environment awareness is key to the HoloLens experience. When your gaze cursor moves around the room, it travels the walls and the furniture, just as if you were projecting a small laser circle.

When you place a Skype “window” or a video player, it snaps to the walls (if you want it to). When you place a 3D hologram on a table, you don’t have to move it up and down so that it sits precisely on the table. Even games can take advantage of environment scanning, turning your living room into a level in a game – and every room will have different gameplay depending on the layout of the furniture, placement of the walls, and so on.

young conker.gif
AHolographic Young Conker jumping on a couch (source)


Environment understanding works by scanning the room and keeping this scan continuously updated. HoloLens can store the results of this scan, and even handle large spaces by only loading the area you are in as you walk down a long corridor. It can also adopt to changes in the environment, albeit there are indications that this adopting may be slow. A developer can access this 3d model (mesh) of the scanned environment, and react accordingly. When using the physics engine of a tool such as Unity, it is just a matter of a few mouse clicks to program a hologram collide and bounce off real world objects.

Tracking

One of the things that amazed me (and journalists) when I tried HoloLens was that if I placed a Hologram somewhere, it simply stayed there. No matter how much I moved around or jumped – the hologram stayed right where I put it.

This is an extremely difficult technical problem to get right. Our mind is trained to expect this behavior with real world objects, so any discrepancies will immediately be revealed and the magic will be broken. To keep the illusion, the device has to be extremely precise in following even the slightest movement of your head in any direction. Microsoft uses four “environment understanding” cameras, an Inertial Measurement Unit (IMU), and has even developed a custom chip – the Holographic Processing Unit – to help with this problem (and some others).

To appreciate the quality of tracking HoloLens provides, take a look at the video below. It is recorded on the HoloLens itself, by combining the front camera on the HoloLens with the generated 3D “hologram” overlay. You won’t find a single glitch or jump here. Microsoft is even making an app called “Actiongram” available which can do similar recordings that can record mixed reality videos – something that is pretty difficult and time consuming to do with the standard tools in the movie industry.

hololens tracking.gif
Note how the camera moves but the holograms stay perfectly put with HoloLens


On the other hand, based on the videos I saw, Meta’s tracking is not yet perfect (but it is close).

meta tracking glitches
Meta’s own marketing video shows signs of not-yet-perfect tracking (see windows in the background)


Road to VR, who – unlike me – had some actual time with the Meta 2 noticed this, too. They said “If you turn your head about the scene with any reasonable speed, you’ll see the AR world become completely de-synced from the real world as the tracking latency simply fails to keep up. Projected AR objects will fly off the table until you stop turning your head, at which point they’ll slide quickly back into position. The whole thing is jarring and means the brain has little time to build the AR object into its map of the real world, breaking immersion in a big way.”

Sound

Sound, especially spatial sound is very important in both VR and MR experiences. Sound can be a subtle indicator that something is happening outside of your field of vision. Microsoft has invested a lot into being able to provide you with the illusion of sound coming from any direction and distance, and it convinced people who tried it. Meta also has a “Four speaker near-ear audio” system, but it hasn’t been mentioned in the videos or reports I’ve seen. When I asked Meta on twitter, they confirmed that it is there to “create an immersive 3D audio experience”.

In any case, adding spatial sound to an object is probably just as simple with Meta as it is with HoloLens. If you’re using Unity, all you have to do is attach a sound to an object (a simple drag-and-drop operation), and the system will take care of all the complicated calculations that will make it sound like an alien robot has just broken through your apartment wall at 7’o clock.

hololens_01-750x400
RoboRaid  for Microsoft HoloLens


Collaboration between Multiple Users

Both Meta and HoloLens has shown examples of multiple users existing and cooperating within the same holographic space. Meta has even shown passing a hologram from one user’s hand to another’s.

At TED, both companies have shown a kind of holographic “video” call, where the other participant could be seen as a 3D hologram. Microsoft has also demonstrated collaboration among builders, engineers, or even scientists studying the Mars surface. Some of these demos had both participants in the same physical space, others were working together remotely.

HoloLens mars.png
A NASA engineer wearing HoloLens working together with his peer, examining a 3D formation on a holographic Mars (source)


Microsoft is also creating a special version of Skype for HoloLens, which has been piloted on the International Space Station. The astronaut can call experts on the ground, who will see what he sees through the front camera on the HoloLens. Then, the expert can draw arrows pointing out points of interest, or even create small diagrams on the wall to help the HoloLens user solve an issue. The interesting thing here is that the expert doesn’t even need a HoloLens, only a special Skype app that allows him to draw directly in the 3D space of the astronaut.

HoloLens sidekick
“Dad” helping daughter by seeing what she sees and drawing in her holographic space


Microsoft does note though that more than 5 HoloLens devices in the same room may cause interference. With devkits limited to 2 orders per developer, and priced at $3,000, this is not going to be a problem for a while.

Price and Availability

During the last few months, Microsoft has been collecting applications for a developer kit. Anticipating a huge demand, developers had to (and still can) apply and convince Microsoft of them being worthy to the privilege of spending a sizable sum – $3,000 – on a developer kit, which will probably be obsolete in a year or less. Still, there is huge interest, and Microsoft is shipping the devices in waves – I’ve even heard of a wave 5, which is pretty scary, since waves can take 1-2 months to completely ship. HoloLens Developer Edition is all set to start shipping on March 31, but only to US and Canada developers.

Meta has also started taking preorders for their developer kit. Meta’s device only costs $949 – plus the expensive, $1000+ gaming computer you need to plug it into. But at least you can use that computer for other things, such as driving your Oculus Rift VR headset or gaming.

The downside is, Meta will not ship until Q3 2016. Being 6 months away from an actual shipping date has its risks. It means that the device or its software is not yet ready, and / or the manufacturing process and logistics still needs work. Solving these issues can take longer than expected. This can lead to further delays, and while I’m hoping it won’t be the case, there is a chance that the Meta 2 devkit will only ship in Q4 or even next year. But once they do ship, I expect them to get a large amount of devices into the hands of developers fast. Oculus has had 250,000 developers, so with Meta not being limited to North America and only costing one third of an arm and a leg, they have a chance of reaching similar numbers.

Summary

The reason I love this tech is that the use cases are pretty much infinite. And even if 50% of those turn out to have feasibility issues due to technology limitations, the rest is still huge. Every aspect of life, every profession can and will be touched by the grandchildren of the devices I talked about.

I’ve already mentioned a lot of use cases for both devices. But I think it is worth to inspect what the companies themselves emphasize.

Meta’s vision is clear. By removing abstractions, such as files, windows, etc., Meta wants to simplify computing and get rid of the complexity that the last 30 years of computer science has built. They are doing this by making the hand and direct manipulation the primary method of interaction. They are also aiming to get rid of the monitors on the workspace – instead of using multiple monitors, you place virtual monitors or even just floating apps all around you, and if you want to access your emails, you just look at where you put the email app. Still, you will be tethered to your desktop for a while, which is something you should keep in mind when deciding whether a certain use case is fit for the Meta 2.

Meta’s field of view is vastly better than what HoloLens has to offer, and by plugging it into a computer, it has access to a powerful workstation and graphics card, and you don’t have to worry about it running out of battery.

On the other hand, the superior tracking, the environment understanding feature, the ability to interact with holograms that are further from you, speech control, and being tetherless are advantages that opens up use cases for HoloLens that are simply not possible with the Meta 2 (as known today).

Having pretty much surrendered the smartphone war to iOS and Android, Microsoft does not want to be left behind on the next big paradigm shift. So, they are firing from all cylinders – aiming not only at productivity, but experimenting with entertainment and games as well. Building on top of the Windows 10 ecosystem also helps a lot. And with their huge amount of resources, they are creating polished experiences that go beyond simple research experiments in all promising areas. However, Meta shouldn’t be discounted from this race – with the current hype, they are sure to secure a next round of investment or will be bought outright soon. And even if they don’t, the enthusiastic community will help take Meta (and HoloLens as well) to new places.

If you thought that at the end of this post, after more than 5,000 words, I would tell you that the Meta or the HoloLens is better – well, you were mistaken. Both are amazing pieces of hardware, filled with genius level ideas and technology, and an insane amount of research. If you want to jump right in as a developer, have the money, and live in the USA: go for HoloLens. If you are intrigued by the Meta 2’s superior visual capabilities, don’t need HoloLens’ untethered freedom and are willing to wait a little more, probably Meta2 that is the device for you.

In any case, what you will get is a taste of the Future.

I am 42 years old. I grew up with home computers and started this adventure with a ZX Spectrum that had a total of 48 KBytes (yes, kilobytes) of RAM, and an 8 bit CPU running at a whopping 3.5 Megahertz. I lived through the rise of the PC, the Internet and the smartphone revolution. All of these were life changing.

By now, I have a pretty good sense of when a similar revolution is approaching. And my spider sense is tingling – the next big thing is right around the corner. It is called Holographic Computing, Augmented Reality, Mixed Reality – even its name is not agreed upon yet. Once again – for the fifth time in my life – technology is on the verge of profoundly changing our lives. And if you are like me, and yearn to live and even form the sci-fi future of your childhood – this is the area to be in.

My HoloLens Experience

My HoloLens Experience

It took a lot of emails, whining talking to the right people (thank you!), some luck and the dedication from our MVP Lead, Andrew DeBerry and others – but finally, me and the rest of the Kinect for Windows MVP group (or Emerging Experiences MVP group as we call ourselves now) got a chance to experience HoloLens in person during the MVP Summit in November.

This was a pretty big deal for me. I’ve gotten into the small Kinect Emerging Experiences group because of my interest and passion towards new and almost green-field ways of human-computer interaction. And HoloLens is the first mixed reality device that has a chance of being widely available. It has never stopped tickling my fantasy since it first has been introduced. I’ve read every piece of review and report on personal experience from those who were lucky enough to actually try it. I had a pretty good idea on what to expect – but wanted desperately to experience it for myself.

This post is the summary of my experiences. It will be long, but worth it.

Holographic Academy

The Holographic Academy is Microsoft’s dedicated showcase area for HoloLens. It is located in building 37 on the Microsoft Campus. Once we left all our bags and phones at the nearby lockers, we (about 20 of us) gained entry to a rather large room. The room was scarcely lit, but it had more than enough light for us to see well. In the center of the room was a round stage, on which stood a tall, muscular guy – looking just like a drill sergeant from the movies. Around him were about 5 or 6 stations, each with computers, a few HoloLens devices, a table, TVs hanging on the wall, a couch, and a Microsoft employee to help. We were directed to split into groups of 5 each, and each group went to a different station. My group ended up being only four people, and we had three HoloLens devices, so chances were good 🙂

Airtap

The air-click gesture

The “sergeant” started to speak, loudly, with authority, but fortunately without any of the scary uptones. He turned out to be a pretty nice guy, welcoming us to the Holographic Academy, and walking us through the basic gestures of “air tapping” (clicking), and “bloom”, which opens up the Start menu. Once it became clear that we weren’t about to go through a rigorous bootcamp training, and got our congrats for mastering the air gestures, my attention started to wonder. I looked at the device right next to me on the table, connected to the PC nearby for charging. It looked exactly like the one in the pictures, so no surprises there. However, I could see the display area – it was about 3×2 centimeters, but I had no way of actually measuring it. Still, it looked much larger than the Epson AR glass I tried a couple of weeks earlier.

Putting it on

Soon, we had the chance of putting on the device. It has an internal band, which can be expanded and contracted based on the size of your head. The purpose of this band is to bear the weight of the device, and distribute it evenly on your head – it’d be way too heavy to just rest on your nose. The actual device can then be tilted independently of this holder unit – in fact, one of the first surprises to me as a lifetime wearer of glasses was that the nose bridge wasn’t even supposed to rest on your nose. All in all, HoloLens sat on my head comfortably, and soon I’d forget about the weight of it. Ah, and we didn’t have to measure my pupil distance – that seems to be something the device no longer needed or did automatically.

Head pant

The head pant can be expanded and contracted using the wheel in the middle. It is a very premium and comfortable experience.

On the left side, there are two buttons to control the volume, and on the right side, two buttons control the brightness.

image

This is what the volume and brightness buttons look like

When I first looked through it, I saw a pale blue border, indicating the actual screen. Well, it is not a screen, but more on that later. Soon, HoloLens started booting, and I saw the familiar, light blue Windows logo as it did so. Yapp, it’s Windows 10 all right!

At this point I was pretty disappointed with the field of view… it was not just small, but looked like a 16:4 aspect ratio. I soon realized that the top half of the screen faded away, but the bottom side had a very sharp edges. I started moving the headset around, and yes, it seemed like either my glasses or my eyebrows actually obstructed the view. As I moved the movable part of the headset down a bit, I managed to get a full 16:9 aspect ratio display out of it. I know this because I could move myself so that the entire display area covered one of the TV sets on the wall.

Another, very interesting observation: you can not only tilt, but also move the glass closer to or further from your eyes. The travel distance is about 5-8 centimeters, which is quite a lot. And while I did this, the actual field of view has not changed! If HoloLens had a display in front of my eyes, I’d have expected it to shrink as I move it away. But the perceived size of the display area remained the same – this suggests that HoloLens actually uses some kind of projection, and not simply a small display in front of you.

In less than a minute, the logo disappeared, and a small 3D graphic took its place – a line drawing, resembling three mountains, made out of just a couple of lines. A text saying that HoloLens is scanning the environment was displayed. And soon, magic started to happen.

Scanning the Room

SGInsx

The spatial mapping process

The room scanning (Spatial Mapping) looks somewhat like what you see on the videos – triangles made of light start to cover the real objects in front of you. There are a couple of differences though:

  • The triangles were not filled blue triangles, but outlines, made of white light
  • It took about 20-30 seconds for the scan to finish
  • The triangles had sides of about 5-10 real life centimeters. This is more than enough to discover the walls, furniture and other objects in the room, but the resulting mesh is pretty low resolution for anything more than that. I have no idea whether it is just for the coordination of the device in the 3D space, whether the HoloLens is capable of a higher resolution environment mapping, or even if apps can actually access this information.

Start!

During the “boot camp”, we were asked to first use the “Origami” app, and then we were told that we could experiment freely, although a lot of the apps on the device may not work or not work well. So, when the scan finished, the start menu was presented, hanging in the air in a fixed space in front of me. The way HoloLens interaction works is somewhat like a mouse – you have a pointer which you can direct with your head, and the air click gesture to activate whatever the pointer is over. All the usual effects – “mouseover” and click animations, and even sounds are in place.

The way you move your pointer is by moving your head – not your gaze. The pointer is in the middle of the screen, and looks like a small circle. The air click gesture can be performed pretty much anywhere in front of your body. However, simply bending your finger down and up is not enough – it is not a coincidence that we’ve been trained “hard” to move our entire finger and touch our thumbs. If you do this gesture right, it works well, and detection is pretty reliable.

So, as a newbie Holographic Academy graduate, I obediently moved my head so that the pointer was over the Origami app, and clicked – I mean, air-tapped.

Origami

image
An early version of the Origami app. We were shown a much more refined and complex version.

The Origami app starts out as a holographic cube. It moves along with your gaze, and as you look around, it stays mostly in center – but sticks to the floor, the walls and the tables. I moved my head so that it was on the table, and put it there, using the air-tap gesture.

This was the first time I actually examined the holograms themselves. And I think, Microsoft choose a very good name when they decided to call these things “holograms”. They look exactly as what you’d expect after watching too many Star Wars movies. Perfect illusion of 3D objects hanging in space. Still, you’d never mistake a HoloLens hologram for a real life object. There is one fundamental difference: holograms are actually made of light. Real objects reflect light, and thus they are not bright in a dark room (except for lamps and some tricky lighting, but I digress). Holograms are made of light themselves, but their light is not reflected on the furniture around them.

But that’s where the similarities between R2-D2’s projection in Kenobi’s cave end with HoloLens. Because the holograms in HoloLens’s field of view are absolutely amazing. The holograms stick in place. You can move your head around, and they remain exactly where you put them. You can move yourself, and examine the hologram from every direction. You can jump up and down (believe me, I tried, looking more like an idiot than usual), and they are still there. No jumps, no glitches, no nothing. The Holograms are where you put them, and they stay there. They are also extremely solid – there’s barely any transparency to be seen. Of course, this also depends on the brightness level set on the device.

The 3D illusion is also perfect. If you go to an IMAX movie, the 3d can be breathtaking – but you’ll never confuse it with reality. You always know that it’s an illusion. Not so with HoloLens. The holographic objects are “just there”. You don’t have to convince your brain that you’re looking at a 3D thing, because you ARE. There is none of that over-emphasized “look, I am 3D” feeling that you get with 3D movies. Things are just naturally there, and naturally 3D. And this is extremely important to keep the illusion alive – because holograms need to work together, and next to the real, three dimensional reality. This is the real mind-blowing part of the HoloLens tech – the 3D illusion is so perfect, you don’t have to suspend your disbelief, because there is none of that to begin with. Except for the field of view…

OK, back to the Origami experience, which I placed on a small table earlier. There are two slopes in the hologram, seemingly made of folded paper, both of which have an origami ball suspended above them. If you air-tap, the balls fall down on the ramps, roll down, and there is an explosion at the bottom of the ramp as the balls hit the table. Then, the table “opens up”, and through the hole you can peek into a new world. The world has origami birds, clouds, mountains and a blue sky – and you’re looking at it from above. The illusion is perfect, it’s as if you opened a Portal in Valve’s game, and are now looking down from the sky. You can walk around the table, and peek into this portal from every direction – the illusion stays impeccable.

Sounds

Speaker[3]
One of  the speakers

The Origami experience (along with some others) emit a 3D spatial sound, which gives you an important pointer to what’s happening around you and even behind you. Unfortunately, there was something wrong with my device, and I couldn’t get the spatial sound illusion working, even though my spatial hearing is fine in the real world. This was probably some sound driver issue, limited to the device I tried. Others in my group had no sound problems, but my HoloLens actually rebooted itself when I tried to launch the Cortana app. (remember, HoloLens is Windows 10). Also, voice commands didn’t work for me – there was supposed to be a reset world command for the Origami experience, which it didn’t get even when the helper in our area said it leaning close to my headset. BTW, try to do that with a VR headset – it would really freak out the wearer.

The “Holograms” app

After I had enough of the Origami app, I performed the “bloom” gesture again to bring back the Start menu.

Bloom
(This is the Bloom gesture, but the resulting Start menu doesn’t look like this.)

The next app I tried was a simple one – you could select holograms from a list, and place it anywhere in the space. If I recall correctly, the app was called “Holograms”. Once you’ve selected a Hologram, it followed your gaze (meaning where your head was pointing at, not your eyes), and stuck to any surface you were looking at. I could then fix the Hologram in place with an air-tap gesture. Some of these holograms were just static 3D objects, some would animate. If I wanted to move a Hologram, I had to air-tap on it, and a surrounding box would appear. There were text options below the box to delete the Hologram, move it or resize it. Deleting worked much like you’d expect. However, I had some cognitive issues with the resizing. The problem here is that the cursor is usually moved with your gaze (head). However, when resizing, I had to perform a pinch gesture with my finger, and move it in the 3D space. Basically, when performing the “drag and drop” operation, you have to move your hands – but in other cases, the pointer moves with your gaze. Multiple times I moved my head to move the resize handlers, when I should have used my hands at that point. The reason for this is understandable – gaze is a 2D pointer, but when you want to move stuff around, you want to move them in 3D. The HoloLens perfectly followed my hand movement in all three dimensions, but this experience was still somehow confusing to my brain trained for mouse usage.

You can see the difference between moving the pointer with your gaze for clicking, and with your hand for dragging. Takes a while to get used to. Also, see how any Universal Windows App can run on HoloLens?

The first thing I did was to place a rainbow Hologram on the floor, about 2-3 meters from me. As I said before, the 3D illusion was perfect, but you couldn’t confuse the Hologram with anything real, because it was made of light (and the objects around didn’t get lit by the light the Hologram radiated).

The next thing I tried was to put a holographic space suit helmet on the head of a fellow MVP, patiently sitting on the couch and waiting for her turn. I could easily move, rotate and resize the helmet to fit it on her neck. The hologram completely blocked out her head, I couldn’t see her face – until she moved a bit and was only half covered with the helmet 🙂 Still, the illusion was great, and I could move around and look at her helmet from all directions. Now that I think of it, I must have looked like a freaky stalker, staring at her head in my futuristic glasses, with mouth half open in wonder… Sorry 🙂

One thing I haven’t tried though is to place large Holograms. I guess I am so used to small screens that it didn’t even occur to me that computer generated objects can be as big as a human, or even larger. Just imagine using this technology to design clothing, or any machinery, and seeing the result in 3D in real time, in the real environment!

I also placed a small ballerina Hologram next to the small orange table, on the floor. As I moved around the table, it started to cover the Hologram, as a real object would! Well, mostly… because of the low resolution environment mesh, the surface area of the round table was pretty scarcely modelled – and therefore, it couldn’t hide the hologram perfectly. This was probably the weakest holographic experience I had – when a real life object was supposed to hide the hologram, but it couldn’t because the real life object’s mesh was too rude.

I even played with covering the depth sensors on the glass (there are two on each side, looking somewhat outwards). When I covered one, the tracking remained stable. However, when I covered the other one as well, the tracking was lost, and I was back to the initial Environment Scanning, when the environment 3D mesh with the triangles were built up.

Holographic Browsing

The next thing I tried was launching the Edge browser. It worked as you’d expect – a 2D window, floating in front of you in space. Selecting links and navigating was simple enough. However, the text clarity was not perfect, I could see a disturbing ghost image on the smaller text. It may have been because I have pretty strong glasses and there’s more than 1 dioptry difference between my eyes. I should have closed one of my eyes to see if the text would’ve became clearer – but unfortunately, I didn’t think of this while there. Scrolling the browser was simple, a similar drag and drop gesture as what you used for resizing objects.

The Last Mind Blowing Experience

At this point I was running out of time, but so, the last thing I tried was to launch the Photos app. You know, the Windows 10 app that has all you photos? I was expecting another “2D app floating in space”. But boy, was I wrong!

It started out much like the Edge browser – you select the app from the Start menu, place it in space, and start interacting with it. But the thing about HoloLens is that you can move close to the Holograms. And that’s what I did.. I moved closer to the app, looking for the point where the field of view limitations would hinder the experience. But instead, I found something else. I found that the actual photos were in front of the app! Field of view concerns totally forgotten, I moved even closer. And yes – the Photos app was not the same app running on the “standard” Windows 10. It looked similar, but the UI elements were actually in 3D! The photos were in front of the background of the app, and casted small shadows. I moved to the side, and I could actually see the gap between the photos and the rest of the app. And the rest of the app actually had some thickness to it! Not just a thin paper floating in the air – the app’s toolbar had thickness, the app’s background was also a solid 3D object.

To me, this app was the most mind blowing stuff I saw. I was expecting most of the other things, based on what I read and heard of HoloLens before. I just wanted to see those with my own eyes. But… seeing an app I used every day in 3D, with real substance, real width – wow. Just wow. It sounds cliché, but these final few minutes with a solid, 3D version of an everyday 2D app made me realize that this is the device that really transforms computing to a new dimension.